Friday, June 13, 2014

Thursday, May 22, 2014

Irons Cafe Menu

I don't usually work on projects with partners, but this was an exception.


Thursday, May 1, 2014

Identifying elements of a full-page ad

Bullet-pointed once again for ease of access.
  • The product is a nine-day photography workshop.
  • Aspiring photographers are probably the audience.
  • The focal point of the ad is its stunning photograph of a rock formation.
  • My first impression of the ad was the array of colors contained in said photograph.
  • The designer used the slightly less common white-on-black text style to draw the eye to that portion of the ad.
  • The ad has asymmetrical balance; a photograph on the top half and all the text on the bottom half.

A Magazine Cover


Monday, April 28, 2014

Prom flyer


A Quick Study in Magazine Covers

Bullet-pointed for easier reading.
  • The name of my chosen magazine is Popular Photography.
  • The title text doesn't use a layer style.
  • In fact, none of their cover text uses a layer style.
  • The background layer is an incredibly subtle, almost grainy gradient.
  • The cover uses asymmetrical balance.

Friday, April 25, 2014

Illustrator Lab 2

I learned how to create custom brushes in Illustrator today; this wasn't completely new to me, as I've made brushes in Photoshop and GIMP before, but the way in which I could use the brushes definitely was.  My first attempt vaguely resembled a sunburst, although the results it generated looked more like a solid wall of smashed spiders (which was actually kind of cool).  My second brush was generated from a set of squares - I think I liked that one better than the first.

Tuesday, April 22, 2014

Diet Coke Case Study

Although the font hasn't changed significantly, a silver stroke was added around the word "Coke" to make it stand out more (accentuated by the fact that said stroke is "shiny" and therefore draws the eye more than other aspects of the can).  The font is also no longer large enough to give the impression of wasted space (as on the first design) or too small to comfortably read (also as on the first design, but in a different location).

Friday, April 18, 2014

Illustrator Lab 1

Today I tried out Adobe Illustrator for the first time; the interface isn't really that different from Photoshop (unsurprisingly - after all, they're made by the same company), but some of the tool functions were new to me.  After a few minutes of fumbling around with hexagons and colors, I tried the pencil tool, followed by the blob brush tool, and finally the dreaded pen tool.  Out of the three, I think I enjoyed using the blob brush tool the most and the pen tool the least (for reasons that should be obvious if you've ever tried to use it in Photoshop or Illustrator).  Overall, I'd say that this wasn't a bad start to using Illustrator.

Monday, March 31, 2014

Graphic Redesign Part 1

I made a banner as well, but my computer seems to have devoured it.  Never mind, I found it.
Before:
After:

 Reworked:
Before:
After:
Reworked:

Wednesday, March 5, 2014

20 Time Update 08

   This week I colored one of the two chute station models, a process that was made much easier once I remembered to apply the mesh modifiers so that I could select specific pieces of the model using Ctrl+L.  I had to resize some textures again to get them to fit properly, but as you can see in the following image, it all worked out in the end:
   Right now I'm working on coloring the other two buildings (there's three of this type in total, but the view I rendered from doesn't show them all at the moment); when I'm done with those, I'll move on to the remaining type of chute station.


Wednesday, February 26, 2014

20 Time Update 07

Today I finished off the rectangular buildings; they all have their textures and materials (although I still need to set up a node system to make the "windows" glow).
Instead of painstakingly recoloring each building, I duplicated and resized the new one to fit each of the other buildings in the file.  I am fairly satisfied with the results, and I'll probably start work on the chutes (the various tube-things that lead from building to building) next week.

Wednesday, February 19, 2014

Un-20 Time Update

Unfortunately, I was unable to work on my 20 Time project today because I was editing articles for the school newspaper; if I have time to do so, I'll post an update tomorrow.

Wednesday, February 12, 2014

20 Time Blog 06

This week I continued to refine the textures of the buildings on the street.  The buildings have lots of vertices, which means that it takes longer to apply new materials to them, but I think I'm almost done with working on the first rectangular building:

Obviously the fans and the building base will need their own individual materials, so that's what I'll be working on next week.

Wednesday, February 5, 2014

20 Time Update 05

Today I continued to texture the street set.  It wasn't quite as easy as I had hoped - the textures tend to stretch when I use them on the large, rectangular buildings; it's going to need some adjustments and fine-tuning before I even try to move on the other structures.  For now, here's a render of my progress:

Next week I hope to finish the rectangular buildings (or at least fix the texture-stretching problem).

Thursday, January 30, 2014

20 Time Update 04

Due to a lack of an available internet connection yesterday, yesterday's 20 Time update is being posted today.

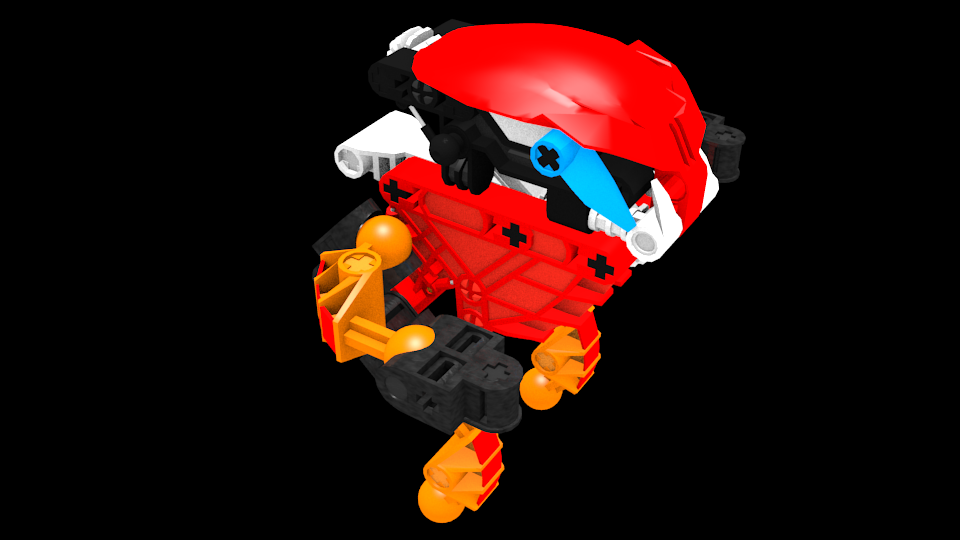
I continued to build the Tahnok character this week, as seen in this render:
Much to my relief, none of the other pieces needed to be fixed.  However, the model lacks feet and hand weapons (the feet need to have a structure added that will allow them to move and the weapons haven't been modeled yet).  I also learned that the Subsurf mesh modifier can be rather destructive at times, so I need to remember to enable it in the viewport when I use it.

Having nothing else to do on Tahnok at the moment, I then moved on to adding materials and textures to an existing set for an upcoming production (please note that I did not model it).  I haven't done much with it just yet, but here's a render of my progress:
Next time, I hope to have some updates from my fellow team members; I haven't decided if I'm going to start a new character model or if I'm going to stick to working on the set.

Wednesday, January 22, 2014

20 Time Update 03

Today I built part of a new model: the Tahnok character (it won't be needed for a while, although it will make a minor appearance as a background character at some point).  Although I was unable to finish it in class, here's a render of what I have so far:
Although I had originally expected to finish it today, I was delayed by the fact that the main headpiece wasn't scaled to fit with the rest of the pieces, so I spent valuable time on fixing that instead.  On the bright side, I learned about selectively applying certain modifiers to an object mesh, which in turn will help me solve another problem that I was having with a different model.  Next time, I plan to finish this character model and hopefully get some updates to work with from the rest of my team.

Wednesday, January 15, 2014

20 Time Update 02

Having encountered a significant roadblock while working on the Roodaka character (as it turns out, there are still quite a few pieces of the character that need to be modeled), I decided to switch to another model.  The first was a quick color/texture update of a mask prop that's going to be used in my team's upcoming animated short:
After I finished that, I added more pieces to a background character model; it isn't finished yet because its helmet piece still needs to be modeled.  However, this character is different because it isn't based off of an existing LEGO set - it was never given an exact form, so I constructed one of my own: 
In the meantime, the rest of my team is busy animating our first real short.  I can't give exact details on it while it's still in production, but I'll post the video here on my blog once we've finished it.